The PS5 connects to the internet and retrieves websites using DNS, which is typically provided by your ISP. While using the default DNS is good, there are a number of benefits to switching to a third-party DNS, including more consistent domain resolution, quicker connection (not browsing speeds), content filtering, and even evading certain geo-restrictions. Here’s a step-by-step instruction to change PS5 DNS settings in a few simple steps. But before we get started, let’s define DNS and why you should care.
Check out 17 Best Apple Arcade Games for Kids in 2022.
What is DNS and Why Should You Change It on PS5
The Domain Name System is in charge of storing website addresses. When we type in a website’s web address, DNS converts it to its IP address, which is a long string of numbers that are difficult to remember and pronounce.
However, there are other DNS versions available, each with its own set of benefits. OpenDNS, for example, protects against phishing sites and filters unsuitable websites. Cloudflare, for example, provides faster connection speeds as well as anonymity, while Google DNS provides transparency and trustworthiness.
Aside from these free options, there are commercial DNS services like Smart DNS Proxy that provide access to geo-restricted content. If you’re a parent and want to restrict which websites your child can access when browsing the internet on PS5, you can switch to Open DNS and limit the access. If your ISP isn’t providing dependable connections, you can switch to Google DNS, and so on.
Here is a list of recommended DNS servers, along with their IP addresses.
- Cloudflare – 1.1.1.1 and 1.0.0.1
- OpenDNS – 208.67.222.222 and 208.67.220.220
- GoogleDNS – 8.8.8.8 and 8.8.4.4
- Smart DNS Proxy DNS – 23.21.43.50 and 169.53.235.135
- Quad9- 9.9.9.9 and 149.112.112.112
- Cisco OpenDNS- 208.67.222.222 and 208.67.220.220
How to Change PS5 DNS Settings
There are two simple ways to modify the DNS settings on a PlayStation 5: changing the DNS on the PS5 and changing the DNS on the router. Each method’s steps are listed below, and you can utilize any of them at your leisure. It will have no effect on how DNS works.
1. Change DNS Settings
The procedures to modify DNS settings on PS5 are slightly different from how you change DNS settings on PS4.
1: Turn on your PS5 and log in, then use the controller to navigate to the Settings icon in the top right corner of the home screen. To access the Settings page, press X.
2: Scroll down the Settings app page until you see Network Settings on the list. To access the Settings, press X.

3: On the left, select Settings, and then click X to launch Set Up Internet Connection.

If you’re using Wi-Fi, your Wi-Fi network will be listed under Registered Networks. Choose Advanced Settings from the pop-up menu after selecting the network and pressing X.

We may modify DNS, IP address, DHCP, Proxy, MTU, and other options here. From the pop-up menu, select DNS and Manual. Two extra fields would be displayed: primary and secondary DNS.
In the primary DNS and secondary DNS columns, enter two distinct DNS addresses. Select your preferred DNS server and click OK.

2. Change DNS for PS5 from the Router
Changing the PS 5 DNS settings through the router, in my opinion, is preferable because it affects every device in your house that connects to the router. Changing the DNS on any router is essentially the same whether you’re using a PC, iPad, or even a smartphone. To describe the procedures to change the DNS on the router, I used Huawei’s HG8145V5.
1: Get a PC or a smartphone and look up the router’s IP address. If you’re not sure, look up your router’s IP address on any device.

2: Copy the router’s IP address and paste it into the URL bar of your preferred web browser. I changed the DNS on the router using the Mac. To log in, enter your username and password. Look at the back of the router or call your ISP if you’re unsure of the login details.

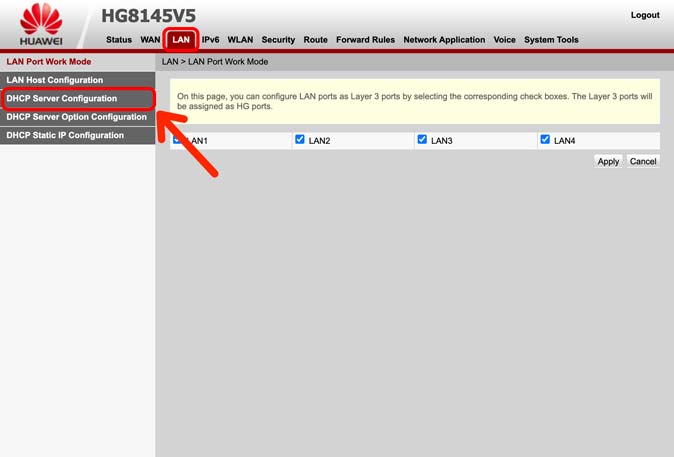
3: After successfully logging in, choose LAN from the top row of options. To expand the DHCP Server Configuration option, locate it and click it.
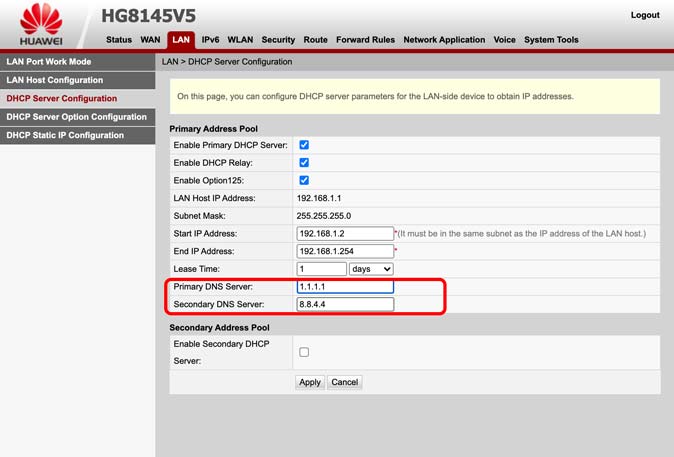
4: You’ll see primary and secondary DNS, as well as an IP address, which was most likely provided by your ISP.

Enter the DNS address of your choice in the text area next to Primary and Secondary DNS.
That is all there is to it. The modifications would be automatically saved. Try clicking the Save modifications option at the bottom of the page and restarting your router.
Read Also: How to Use PS4 Controller on PS5 – Complete Guide
Conclusion: Why you should Change PS5 DNS Settings
The two techniques for changing the DNS settings on PS5 are as follows. The first method is to alter the DNS settings directly on the PS5 itself. However, if you want the benefits of a custom DNS on all of your home’s Wi-Fi devices, altering it from the router is better. What do you think? Let me know on Twitter.
2 thoughts on “How to Change PS5 DNS Settings for a Better Experience”