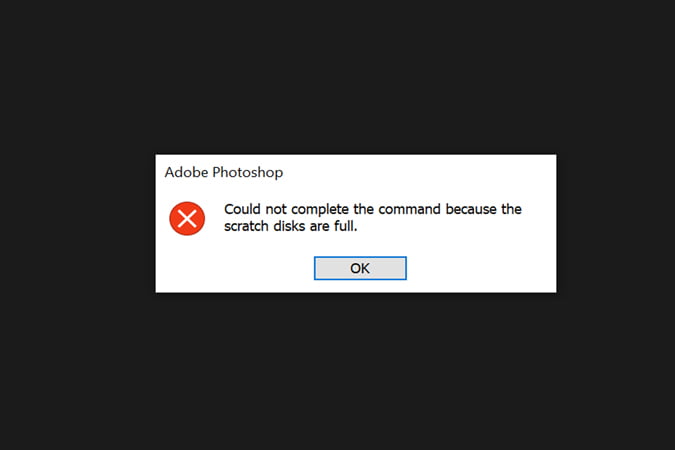
If you use Adobe Photoshop frequently, you’ve probably experienced the dreaded scratch disc error. In my experience, it has typically shown when I try to create a new file, but several people have also seen scratch disc errors when editing. Because this is a prevalent issue, let’s look at how to fix the Photoshop scratch disk error on Windows.
Do you know How to Transfer Photos from iPhone to PC?
Fix Photoshop Scratch Disk Error
What Is a Scratch Disk?
In basic words, a scratch disc is a temporary storage area used by Photoshop. It’s used by Photoshop to store bits of the file you’re working on that don’t fit in RAM memory. These are frequently stored in the root directory of your computer’s default storage drives.
How to Find Your Scratch Disk Drive
By default, Adobe Photoshop uses the hard disc that houses your operating system. When using a public computer, though, you can immediately determine which volume is being utilized as a scratch drive. To do so, open Photoshop and select the Edit tab at the top of the screen. Scroll down to Preferences and choose Scratch Disks from the pop-up menu.
This will display all accessible volumes as well as the active scratch disc volume (continue reading to know more).

How to Change Scratch Disks
If you’re having problems with scratch discs in Photoshop, the first thing you should do is change the scratch disc volume. There are two ways to accomplish this. To begin, use the same way we discussed previously or at the start-up. Here’s how you can change the scratch disks in Photoshop.
1. Go to Edit > Preferences > Scratch Disks in Photoshop. Now, on the left, click the box beneath the Active? option in the settings window. You may quickly delete the default disc, add extra drives, and change the scratch disc from this screen. To save your changes, click OK in the top right corner.

2. When you run Photoshop, you can also change the scratch disc preferences. When you launch Photoshop, just press and hold the CTRL + ALT keys. This will bring up the Scratch Disk Preferences menu. The default OS volume will be the first scratch disc. In the same page, you may set disc preferences that will be utilized if your storage space is low.

Ways to Fix Adobe Photoshop Scratch Disk Error
We’ve compiled a list of remedies that have proven to be effective in resolving scratch disc errors in Adobe Photoshop.
Clean up the default scratch disc drive on your local machine. Search for Disk Cleanup in the Windows Start menu and pick the default scratch disc drive. Select Temporary Files, Error reports, Thumbnails, and any folders you believe are using up unneeded space in the following box, then tap OK. At the top, you may get a preview of the space you’ll liberate.

If you’re dealing with numerous levels, each modification adds to the history of the material (helps you to undo). These can also take up a significant amount of space. Go to Edit and pick Purge to clear things up. Click on All to delete both the Clipboard (which stores what you copied) and the History (which records your steps).
Note: You won’t be able to paste what you last copied or examine the history in your Photoshop project once you clear the data.

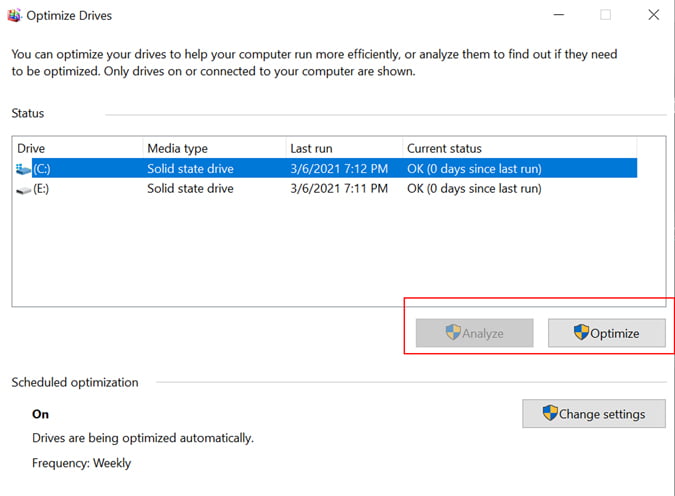
De-fragmenting discs is a routine maintenance procedure that keeps your equipment in good working order. It reorganizes data on the hard disc to improve app performance. This strategy may be useful because Photoshop requires un-fragmented space. To optimize drives, go to the Start menu, open De-fragmenter, pick the scratch drive, and then click Optimize.
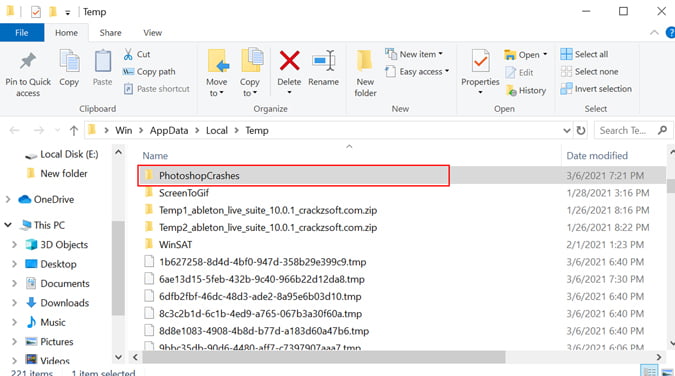
Photoshop creates temporary files like crash reports as well. Using the Run command, we can remove them. Press the Windows key and R at the same time (key). Then, to enter the temporary files folder, type %temp% and press Enter. Look for the name of a Photoshop or PST file and remove it.
Disabling auto-recovery or giving Photoshop extra RAM are two more techniques that have been proposed by many. However, I do not advocate it because it may have an impact on your whole process.
Workaround for Photoshop Scratch Disk Error
Consider yourself fortunate if the strategies listed above worked for you. Even after trying every method, I couldn’t seem to solve the problem. As a result, a solution that worked for me could also work for you. We’ll look at two different approaches.
Revo Uninstaller
For the first option, we’ll utilize Revo Uninstaller, which is a free uninstaller. It enables users to do numerous cleanup operations in one location and to eliminate any lingering trash files after uninstallation. We’ll make use of the Junk Cleaner tool.
1. To begin, download Revo go to the left sidebar, and choose the Junk Files Cleaner option. Then, on top, click Scan and wait for the procedure to complete. Once the garbage files have been revealed, click Delete to remove them.

Recent Project Trick
2. This solution is for you if you get a scratch disc error while trying to create a new document. You’ll be able to open projects from the recent documents (Photoshop start-up) in most circumstances.
After that, all you have to do is modify the canvas size and get back to work. So far, this has been the only way that has worked for me; I hope it will work for you as well.

Check out here some Best Photo Booth Apps for iPhone in 2022.
Closing Remarks: Solve Photoshop’s Scratch Disk Error
These are some options for resolving the scratch disc problem in Adobe Photoshop. We hope that your issue has been repaired and that you are now able to edit photographs as normal.