
Because finding a CD/DVD ROM is becoming increasingly difficult, most users prefer to install an operating system or software edition using a bootable USB drive rather than a CD/DVD drive. There are numerous software tools available for Windows that can assist you in creating bootable USB devices. Microsoft has its own tool as well. Rufus, a free and open-source application, is one of the greatest accessible tools. And many users prefer Rufus to create a bootable flash drive. Rufus is one of the few essential programs that every Windows user should have on their computer.
You should know about the 7 Ways to Fix SSD Not Detected in Windows 10
Rufus to Create a Bootable USB Drive
The methods below demonstrate how to easily create a bootable flash drive in Windows using Rufus. (You can also use Rufus to format a USB drive in FAT32, which you can’t accomplish with Windows 10s default formatting tool.)
Note: This guide assumes you have the ISO file already. You can get the ISO file from the developer’s website if you don’t already have it. SourceForge is a well-known and trustworthy source for such ISO files. Also, make sure the USB disc you’re using is at least 8 GB in size and doesn’t contain any sensitive information.
Have a look at 32 Bit vs 64 Bit: A Complete Guide to Windows OS
How to Create a Bootable USB Drive
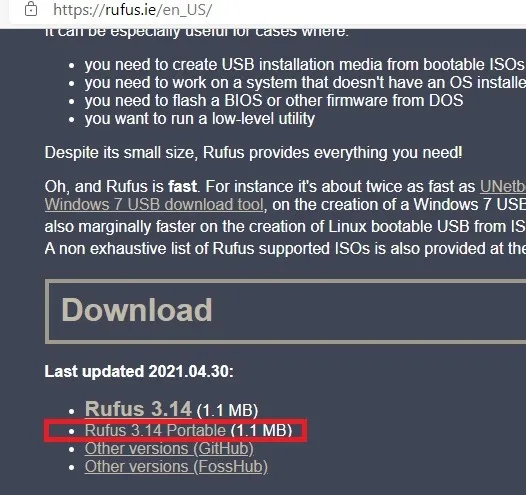
1: If you haven’t already, get Rufus. Scroll down the page to find the most recent updated links, as well as any earlier versions. Rufus is available in a portable version as well as a standard installer. If you don’t want to install the software, you can download the portable version. If you don’t want to install Rufus on your machine, download the portable version. I downloaded the portable version in this scenario. Install and open Rufus after downloading the.exe file.
You’ll see a notification asking if you want Rufus to scan the internet for updates. To continue, select “yes.”

2: Insert the USB drive, and it will appear in the top drop-down option right away. When you’ve found the drive, select it with the “Select” button.

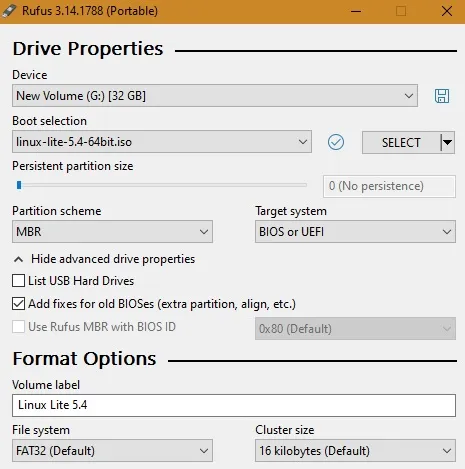
3: Navigate to the folder where you saved your ISO file using the Browse window menu. Choose it and press the “Open” button. I selected the ISO in this case because I wanted to construct a Linux Lite bootable USB stick.

4: (Optional) To compute and view the MD5, SHA1, and SHA256 checksums of the ISO file, click the small “Check” icon next to the “Boot Selection” drop-down menu. This is used to see if the ISO file has been tampered with before.

Allow a few moments for the computation to complete. If there are no red signals, your operating system/software edition is safe to use on your computer.

5: From the Partition Scheme drop-down menu, choose “MBR,” and from the Target System drop-down menu, choose “BIOS or UEFI.” Select the “Add fixes for ancient BIOSes” checkbox under the “Advanced Drive Properties” section if you’re trying to use this bootable USB drive on an older machine.
6: (Optional) The “Volume Label” box can be used to change the name of the USB device. Also, make sure the “Quick Format” checkbox is chosen under “Advanced Format Options.” Quick Format reformat the drive quickly by omitting the inspection for faulty sectors, as the name implies.

7: Select “Start” from the drop-down menu.

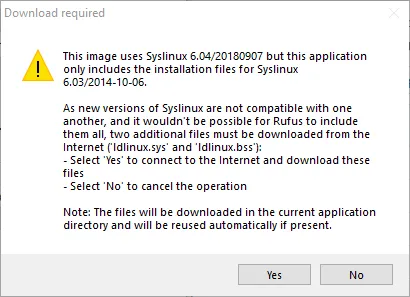
8: Rufus may request you to download extra files depending on the ISO file. Rufus, for example, will request you to download the latest version of Syslinux in order to make a bootable Ubuntu disc. Rufus will take care of everything if you press the “Yes” button.
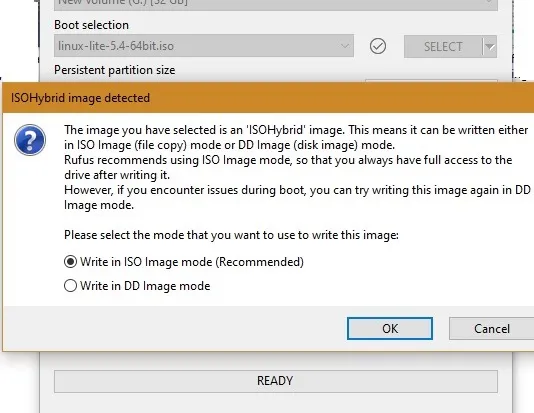
9: Select the suggested “Write in ISO image mode” option in the next window and click the “OK” button. A drive format warning may also appear; click the “OK” button to proceed.
10: You will see a notice that all data on the device will be erased as soon as you begin the formatting procedure. It’s not a big deal because you’ll be able to restore the data later, so click OK. Follow the instructions in this guide to re-use the USB drive as a data storage device.

11: Rufus begins creating the bootable USB drive as soon as you click the button. The creation procedure can take a few seconds or minutes, depending on your USB drive.

12: When you’re finished, you won’t see a message, but you will hear a sound, and the progress bar will become totally green.

13: Use File Explorer to see if a new bootable drive has been created.

Also, check out: How To Create a Bootable USB for Windows
Wrap up:
As you can see, Rufus makes it simple to create a bootable USB device. Rufus will convert any operating system/software edition, no matter how sophisticated, into a usable drive if the disc has enough capacity. Other utilities, such as BalenaEtcher, WinToFLash, UNetbootin, and Yumi, can achieve the same result as Rufus.